Lion's Head
Discover a Dramatic Vertical Wall Dive with Red Coral and Predatory Fish
Lion’s Head is an extraordinary dive site located within the Portofino Marine Protected Area, known for its striking vertical wall covered in vibrant red coral and its rich, ever-changing marine life. This site offers three dive routes—one reaching a maximum depth of 40 metres and two other shallower routes ideal for beginners—making it a versatile spot for divers of all levels.
The dive begins from a boat, with mooring available nearby. With excellent visibility and light to no current, Lion’s Head is best explored in calm sea conditions. Whether you’re looking for colourful macro life in crevices or hoping to spot pelagic predators in the blue, this dive promises an unforgettable underwater experience.
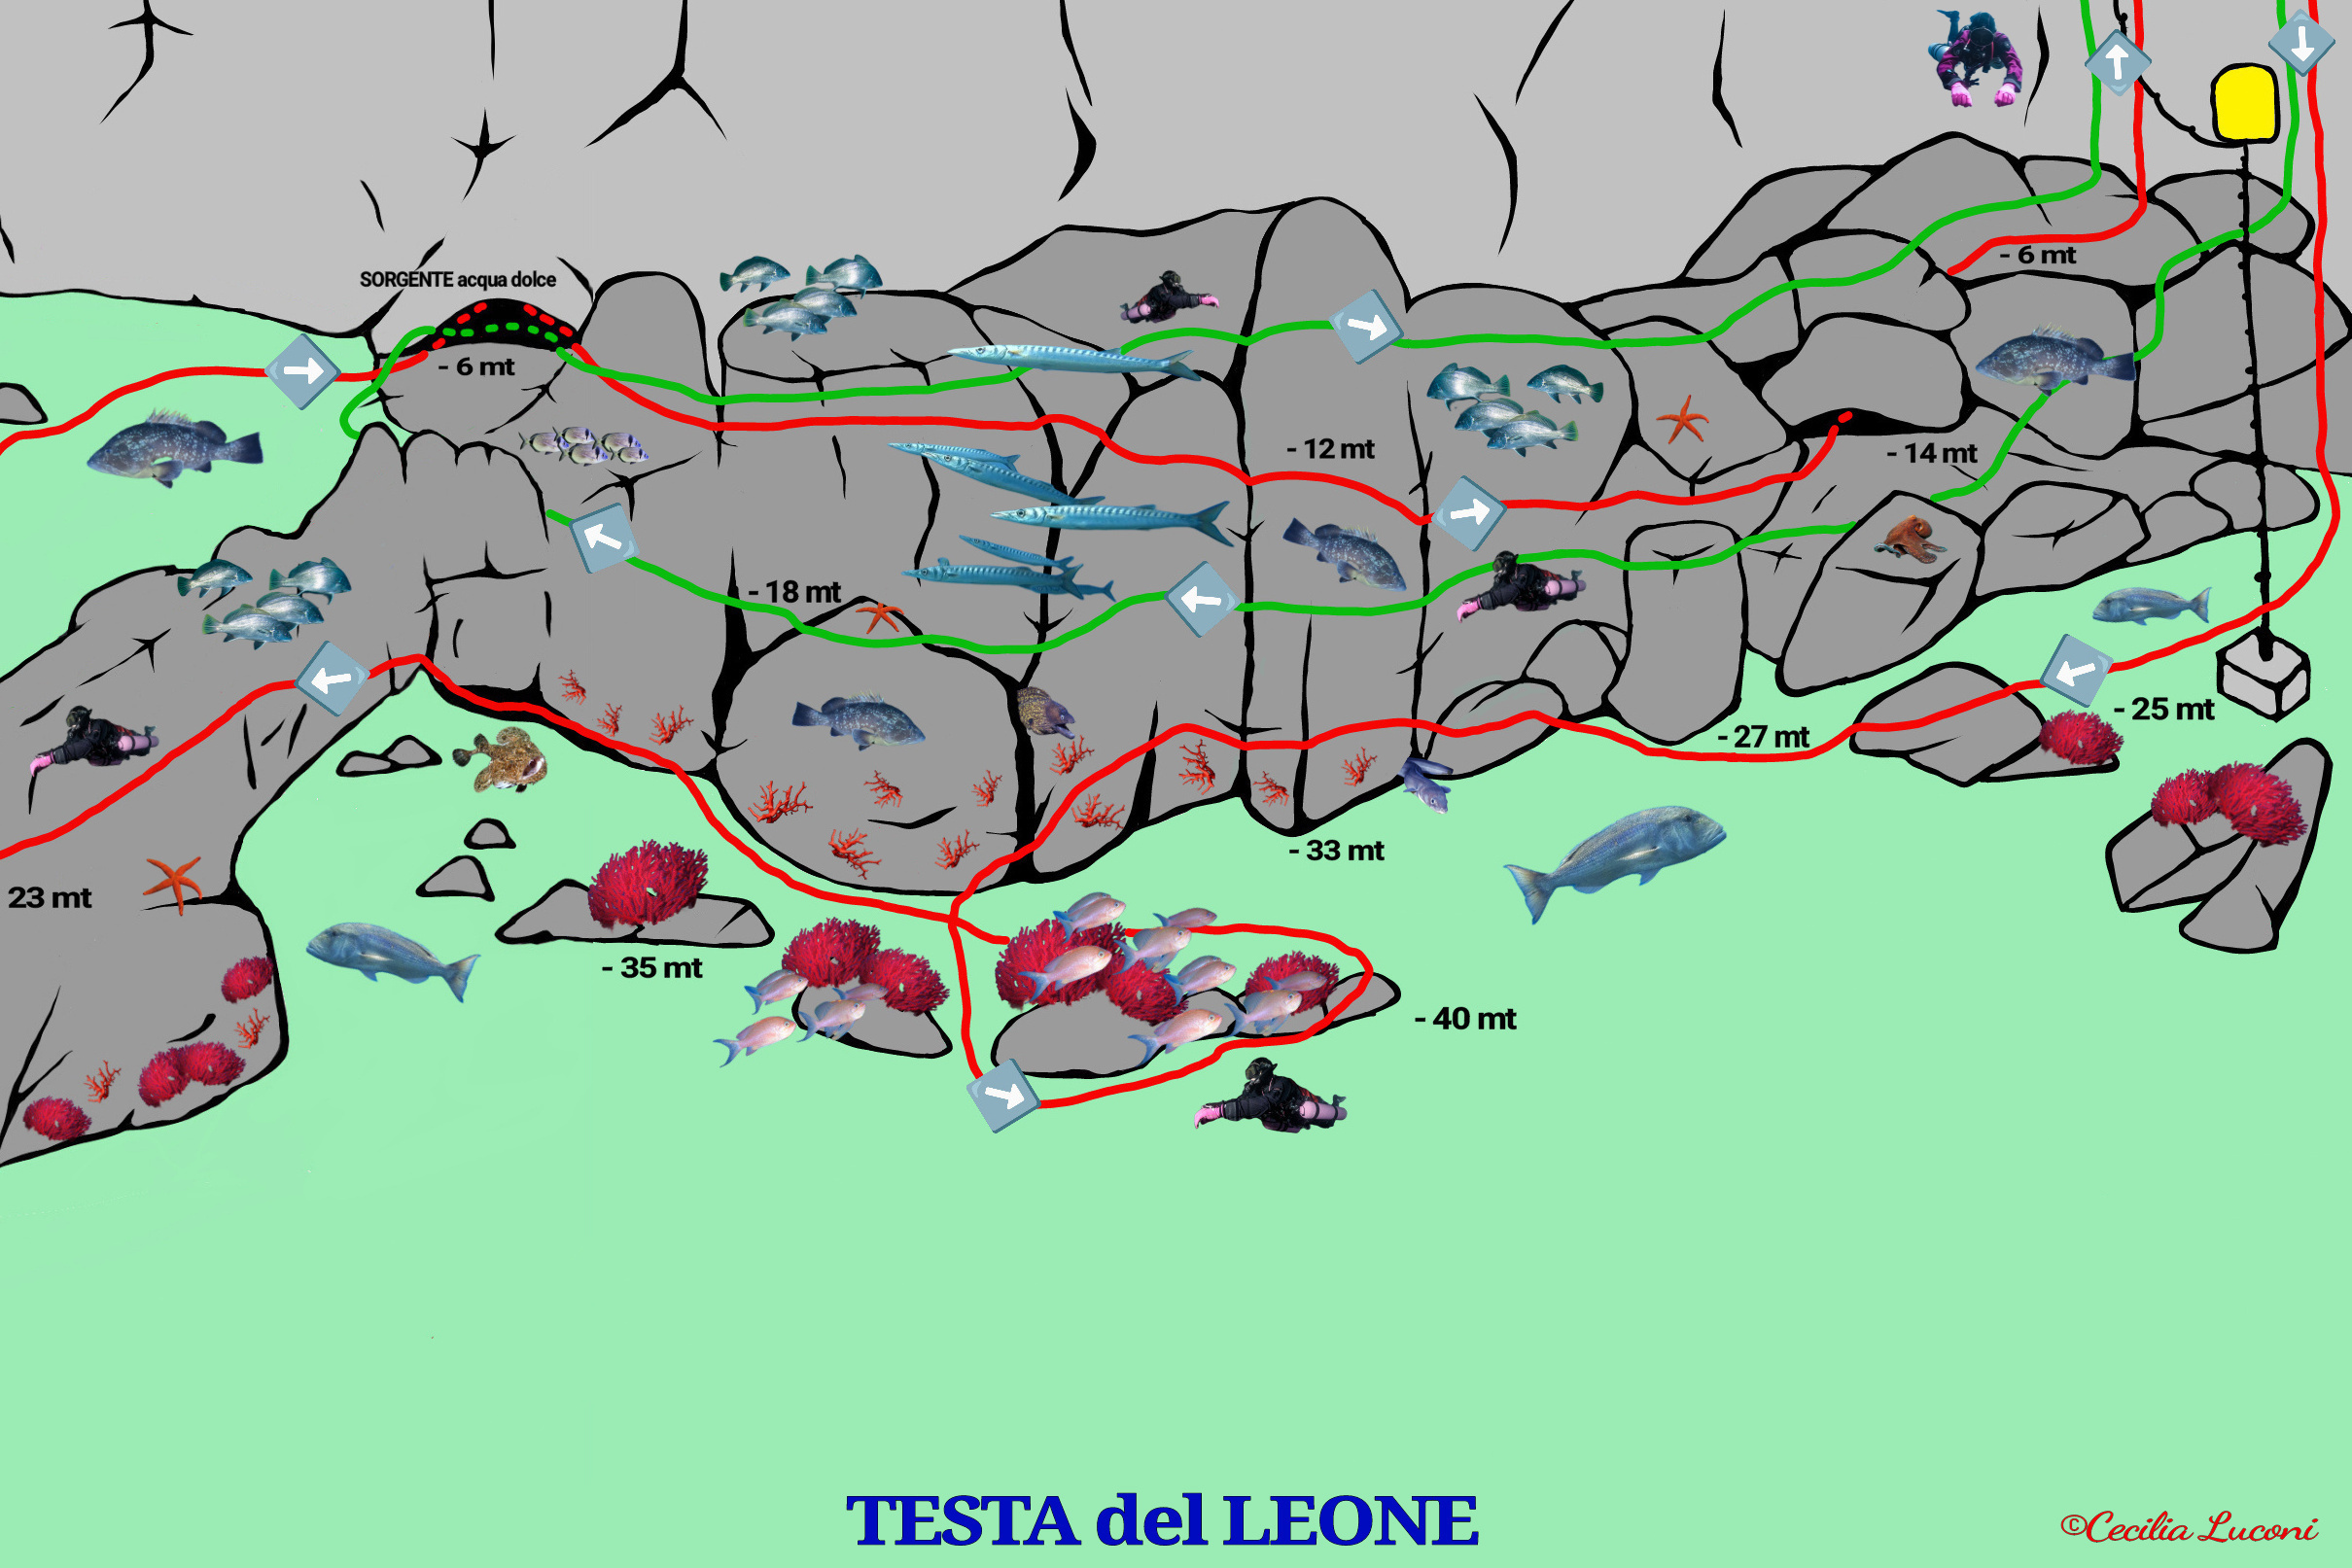
🔴 RED ROUTE (up to -40 m)
DESCENT
-
After completing the pre-dive check, we have two options: either descend near the mooring buoy to reach the anchor block at around -27 m, or follow the wall, taking a reference point at -6 m for the return, as the boat is moored slightly away from the headland.
OUTBOUND
-
With the wall on our right, we’ll swim south, first encountering a landslide area with large boulders stacked upon each other.
-
We’ll light up the many cracks and crevices in search of lobsters, moray eels, forkbeards, and nudibranchs like sea slugs.
-
Keep an eye on the blue – it’s common to see predators such as barracudas, amberjacks, dentex, and tuna passing through.
-
After reaching a depth of -40 m, we’ll begin to ascend until the wall ends, opening onto a sandy plateau at around -23 m, with a solitary boulder in front of us.
-
We’ll circle around it and reverse direction with the wall now on our left, gradually ascending until we reach -6 m and discover a small yet fascinating cave. Inside, a freshwater spring creates a halocline effect as it mixes with the saltwater.
RETURN
-
We’ll continue swimming with the wall on our left at around -6/7 m, descending again to -14 m to reach a passage between rocks near the bay, with the exit at -6 m.
ASCENT
-
After exiting through the rock passage, we’ll perform a 3-minute safety stop at -5 m.
-
If visibility allows, we’ll head towards the mooring buoy; if not, we’ll exit via the wall.
🟢 GREEN ROUTE (up to -18 m)
DESCENT
-
After completing the pre-dive check, we have two options: either descend near the mooring buoy to reach -18 m before moving away, or descend along the wall, taking a reference point at around -6 m for the return, since the boat is moored slightly away from the headland.
-
We recommend the second option.
OUTBOUND
-
With the wall on our right, we’ll swim following the contour of the headland at a maximum depth of -18 m.
-
The wall is rich in cracks and crevices. In the blue, it’s easy to spot predators such as barracudas and dentex.
-
Once we reach the end of the long wall, we’ll turn 180°, keeping it now on our left, and ascend to -6 m to visit the small but fascinating cave where a freshwater spring creates the halocline effect.
RETURN
-
It’s time to make our way back to the bay where we started.
-
We’ll continue swimming at around -6/7 m until the large bay opens up on our left.
-
We’ll keep following the wall until we find the same reference point taken during the descent.
ASCENT
-
After the 3-minute safety stop at -5 m, if visibility is poor, it’s best not to try reaching the buoy but instead exit via the bay, staying close to the headland.
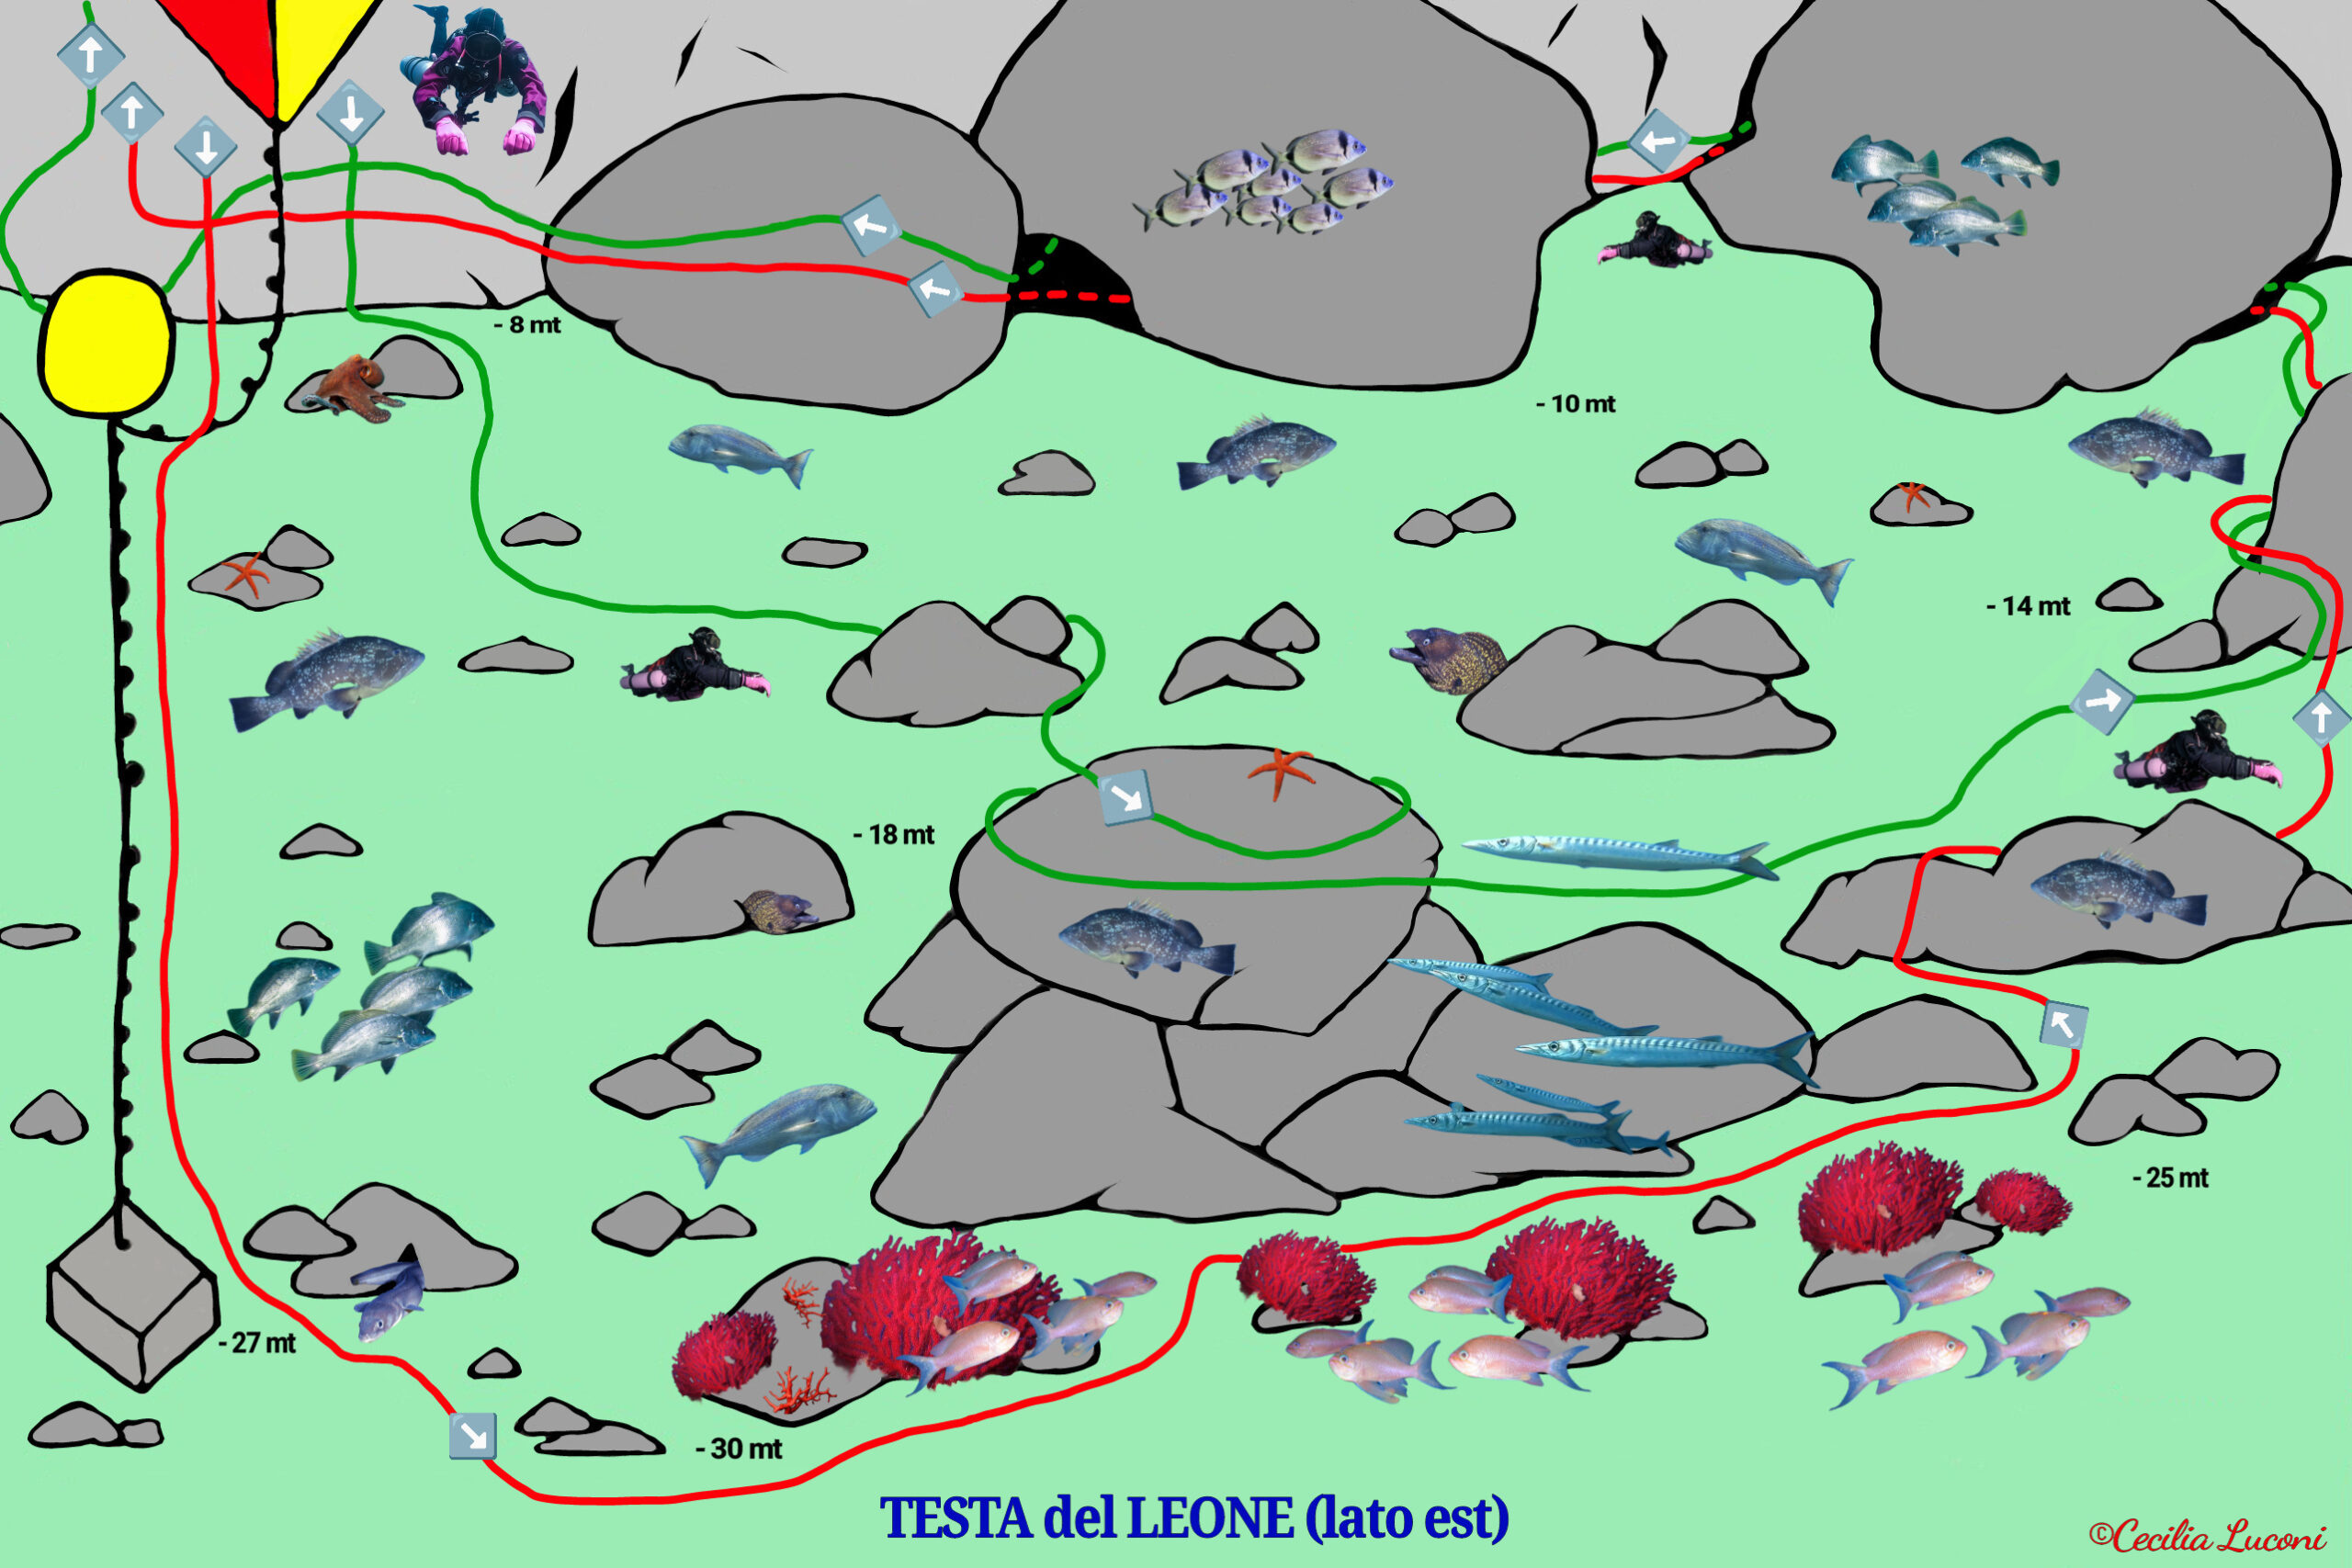
THE EAST SIDE (wall on your left) is instead characterised by a rockfall.
This dive is truly beautiful when done at high tide. Abundant fish and imposing boulders projecting outward create a truly impressive underwater environment. It’s ideal for Open Water Divers, it’s a great alternative dive site for those wanting to try a different route.
🟢 GREEN ROUTE (up to -18 m)
DESCENT
-
We’ll descend along the wall, identifying a reference point at around -6 m for the return.
-
After the pre-dive check, we’ll be ready for a fantastic loop dive.
-
At -8 m, we’ll continue descending with the wall behind us, heading south-east until we reach a large boulder at -18 m, home to numerous groupers and dentex.
OUTBOUND
-
We’ll keep swimming with the wall on our left, among the rocks, lighting up the various crevices where we may spot moray eels and octopuses.
RETURN
-
After about 20 minutes, or once we’ve reached 100 bar, we’ll ascend with the wall now on our right, to -10 m, where we’ll find huge boulders jutting outward.
-
You can even swim underneath some of them, as they’re detached from the seabed – a fun and exciting part of the dive!
-
At this depth, there’s always an abundance of fish: groupers, dentex, sea bream, brown meagres, schools of salema and damselfish, and ornate wrasses dancing frantically across their rocky stage.
ASCENT
-
Once we’ve reached the same reference point from our descent, we’ll decide whether to exit there after our 3-minute safety stop at -5 m, or head for the mooring buoy if visibility allows.
Dive at Lion’s Head with Diving Group Portofino
- Location: Portofino Marine Protected Area
- Access: Boat dive
- Best conditions: No or light current, good visibility
- Depth: 18 m (Green Route) | 40 m (Red Route)
- Difficulty: From beginner to advanced
If you love coral-rich walls, this is the dive for you! Book your dive now!
Cecilia Luconi


